Pages

Wednesday 29 March 2017

March Tag.. Spring is in the air.

As some of you may know each month I have been creating a Tag using the same 
prompts/instructions given in a 12 week Tag challenge last year... 
It's a *Personal* Challenge I have set myself....Here is my March creation


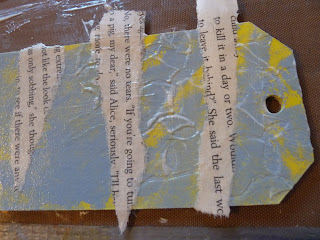
1:Tando Long Tag Covered with White Gesso then  layer of paint Dylusions Lemon Zest, 
2: A Layer of Blue Sky Acrylic, applied with a sponge to mark make.
3: Modelling paste pushed through a leaf design stencil (not too sure who its made by)
4: Strips of torn book pages used as collage and covered with matt medium.


       5: A layer of Diluted Lemon Meringue Acrylic paint covers the tag.
6: Dylusions Chopped Pesto dripped down the side of the tag.
 7: DecoArt Textured Sand paste pushed through a flower design stencil.


8:Coated the whole tag in clear Gesso
9: Stamped Foliage from PaperArtsy Eclectica EKD06 by Kim Dellow..
(Thank you James I love my Mothers Day Stamps)
10: Used the Large Flower head from the set as my Focal image
coloured with pencils and layered for dimension. 


11: Leaves have been coloured with wink of stella dark green,
Indentations highlighted with Inktense pencils and washed with water to fix them.
Gilding wax rubbed over any raised area.
White Posca pen highlights dotted here and there.
Distress dyed ribbon along with another coloured stamp from Kim Dellow
adds to the embellishing.

12: Words Spring is in the air are from Tim Holtz


and that is my March Tag completed following those simple instructions.

Thank you for popping by, I hope you have been inspired by my creation using those 
(Thanks again Chris..x)

Creative Hugs from Tracey xx

Sunday 26 March 2017

**Happy Mother's Day**

Today in the UK it's Mother's Day a day to reflect and give thanks to our 
closest and dearest as well as rejoicing Mother figures all around. 

 I'm sharing last years Mother's Day makes with you today just in case 
the Mom and Mum in my life hasn't opened theirs yet.

**Happy Mother's Day**


The cards have been created using Hobby Art Vintage Flowers stamped 
onto a memento ink wash background and coloured using ProMarkers.


The Jewellery is my handmade Rosary style necklaces, using semi precious, porcelain, pearl and lampwork beads all linked together using wire, each link handcrafted individually.

             The MDF bunting is from the Stamps Away Collection with stamps included 
and finished off with corner embellishments.

                  
        I'd like to wish Mom's, Mum's and those that play the role of being one, the happiest of days and remember those that are no longer with us with the kindest of hearts. 

What ever you are doing today, I wish you all a day of Sunshine..

Hugs from Tracey xx              

Friday 24 March 2017

Sweet Dixie .. Lilly Make a Wish

This Friday I am featuring a card created using stamps designed by 
Kath Halstead Sweet Dixie Lilly make a wish from Personal Impressions.

I love this Water Lily border it reminds me of those wondrous paintings by Monet.

Here's my quick and easy not so Monet creation.


A background was created by blending Tim Holtz Faded Jeans 
Distress Oxide ink onto watercolour card. Water has been splashed onto the 
background and blotted to help lift some of the colour off. 

The Water Lily border has been stamped and embossed across it.


A watered down wash of white Gesso is applied to make the background more
 subtle and enables the colour lifting off to pool around the embossed areas..


 When dry the Water Lilies have been coloured using a White Posca 
Marker and Kuretake wink of stella brushes.


The Dream sentiment along with the flourish swirl has been stamped, 
embossed and the card edged with Faux stitching before mat and layering.


Thank you for sharing your time 
and what ever you are up to this weekend have a wonderful one.

Hugs from Tracey xx

Tuesday 21 March 2017

Spring time nesting

As Spring has officially sprung I'd like to share my mixed media birds nest 
with you all, using media from both indoors, outdoors and elements of nature
.. and enter Rubber dance Stamps Everything Spring Challenge with my project.


Please join me on my bird nest building bullet point journey.

1: Mix Americana Burnt Sienna and Burnt Orange DecoArt Acrylics with PVA.
2: Saturate twine, string and torn calico by soaking into the mixture.


3: Onto a painted wreath ring build up layers of the soaked calico, twine and string
4: Stamp and emboss Rubber Dance Stamp Textured Feathers onto painted paper.
(I purchased mine from UK retailer Thats Crafty)


5: Highlight and colour the feathers with Posca Markers, cut out and adhere to the ring.
6: Adding natural elements like twigs,leaves and garden foliage help to simulate a nest.


7: Halved clear plastic egg shells have been speckled on the inside using a posca black marker then painted on the inside with chalk paints of yellow, white and duck egg blue.


8: Painted Black card glued to the ring creates the nest base for the painted egg shells.


9: Dried tea leaves have been sprinkled around the shells to replicate the earth.
10: Stamped Rubber Dance Textured Leaves have been coloured with 
promarkers, cut and glued in and around the nest. 

Just another element of nature among many that a bird may use to feather its nest 
all coated with a layer of DecoArt Matte Medium.


... and my project is complete...

Thank you for sharing your time I hope you have been inspired.

Until next time
Creative Hugs from Tracey xxx

Friday 17 March 2017

Sweet Dixie Wedding Cake

Taken from Sue Dix Sweet Dixie Wedding Cake stamp set here are two simple cards from the newly released Wedding Collection from Personal Impressions.

Sweet Dixie Wedding Cake


Coloured using Graph'it Markers the image is stamped 
multiple times cut and layered to give a dimensional look.
Platinum Stickles glitter glue has been added to the swirls along with
pearls to the centre of the flowers.


My second card has been created using elements and sentiments from
 the set to create a patchwork card by stamping, cutting, mat and layering.


The Champagne glasses have both been stamped twice layered to give 
dimension and flowers added as an extra flourish.


Two simple cards to mark a couples Special Day.

Have a wonderful weekend
Hugs from Tracey xx

Thursday 16 March 2017

Art Doll Challenge

When a monthly challenge to produce an Art Doll no Taller than 10" 
was announced in a lovely little FB group I am in I was *STUMPED..!!* 

 I have seen many Art Dolls but always associated them with professional Doll makers. 
It was only when a catalogue of pictures was shown giving ideas that I realised an Art Doll can be made from anything and everything and they are everywhere.

Here in words and pictures is how my Art Doll was created.


Using a 5.5" mini art mannequin I first painted in Gesso.


After lots of head scratching, umming are ahing my initial thoughts were to create a 
Doll with Alice from Alice in Wonderland in mind so I covered the body 
and arms using old pages from Alices Adventures in Wonderland.


Continuing with torn pages I moulded a dress.
The Yellow Post it Note Head is my Blue print just for sizing..!!


On Calico I stamped the Facial features using Paperbabe Doll face 
Stamps and coloured using Posca Marker Pens.
The calico was glued onto card and cut out along with another for the back of the head.


Both back and front have been glued together and placed over the wooden mannequin head. Bulldog clips have been used to hold the head together until it dried completely.


Lace has been applied to gaps in the dress also glued around the body to make a bodice 
and stained using tea. Hair has been applied using torn strips of calico and garden twine.

It wasn't until this stage that I decided I didn't want to replicate an Alice doll. With her raggedy dress and hair she almost seemed to be turning into Miss Havisham from 
Charles Dickens Great Expectations.


A little grey wash of paint and PVA and Miss Havisham is born, 
with her faded yellowed wedding dress, 
veil and headdress my Art Doll is complete.


This challenge was a real test for me, unsure every step of the way how to produce her but I must say I really enjoyed the way she evolved and have become quite attached to her.

Thank you for sharing your time and I hope you find these words and pictures helpful 
especially if you have been considering making one yourself.

Creative Hugs from Tracey xxx

Sunday 12 March 2017

On the cusp of Spring..

As time plays a big factor in March and we lose an hour with BST its an early reminder that the lighter nights will soon be upon us along with awakening nature and floral beauty.

Today I'd like to share a project I finished a good few weeks ago..


Using a plywood painters palette I first coated it in white Gesso.
Mixing Pink Iced Gem acrylic paint with IndigoBlu Super thick slap it on I used the
Girl in Profile stencil as a guide to create the face profile.


Versamark embossing ink has been stamped through the Laurel Leaves Stencil with Luscious pigment powders Gold, Bronze and Penny Dreadful gently dusted on top.


Images are stamped from both A5 IndigoBlu Live Laugh Love and 
the Blooming Great stamp sets.


By adding drops of water to a small amount of decanted Luscious pigment powder the stamped images have been painted using Coral, Raspberry, Gold, Buttercup, Lawn, and Purple. They have then been cut out and scrunched up to give a worn look.


A hole has been measured and punched into the palette ready for the clock fitting and a layer of white Gesso applied over the whole image to make it sink into the background.
Super Thick Slap it on was then been pushed through the Small Clock Face Stencil.


As Super thick Slap it on dries clear Gilding wax has been used to highlight the clock face. The small flowers from the Blooming Great stamp set have been placed on the
3rd, 6th, 9th & 12th Hour making it easier to read the time from afar.


Butterflies and Dragonflies have been randomly stamped onto the palette from the
Live Laugh Love stamp set and Painted with Rose, Poseidon Blue and Lawn Luscious pigment powders before assembling the clock mechanism.


The scrunched and cut flowers and leaves have been applied after the clock mechanism was fitted as I could then see the surrounding space and make sure both flowers and leaves did not interfere with the clock hands as they moved around.


I'd been waiting for the right project to come along to be able to use this paint palette 
and I must say the image created seems to fit perfectly. 

Thank you for your time, I hope you have been inspired.

Creative Hugs from Tracey xx

Friday 10 March 2017

Sweet Dixie Wall Flower

This week I have been playing with another of Kath Halsteads new releases
 Sweet Dixie Wall Flowers Happy Birthday Stamp set from Personal Impressions.


First I created a background using Tim Holtz new Distress Oxide inks, using Vintage Photo, Fossilized Amber and Spiced Marmalade. Applying the ink with cut and dry foam I removed part of the design by splashing and dripping water lifting it off with blotting paper.


Small amounts of DecoArt textured Sand paste was dabbed randomly
onto the background, when dry the edges of the background torn
and areas carefully burnt through to add a little interest.

The main wall flower image was stamped centrally onto the background adding the
brickwork stamps both top and bottom of the image to extend the design.
The focal image was also stamped separately for use as a topper.


Coloured using ProMarkers the topper has been distressed using 
walnut stain distress ink. Faux stitching, lace and white pen adds to the detail.


The roses have been multi stamped, coloured and layered. The With Love sentiment added and a distressed bulldog clip helps to break up the squareness of the design.


I chose to mount this creation onto a 6" x 6" Canvas 
but it would make a great card for a loved one.

Thank you for sharing your time, I wish you all a fabulous weekend.

Creative Hugs from Tracey xx